Claude Code / The editing studio
Build your own
editing studio.
Drop in a raw clip, pick how every beat of it looks, and get a reel cut in the style of the creators you love. These are the prompts behind the studio in my video, in the order I'd run them.
You commented EDIT. Here are the 5 prompts in order, plus how I taught Claude a creator's style from 30 of their reels.
By Artem Novitckii · 28 October 2026
8 chapters · 5 copyable prompts · Runs on your own computer
Paste it all into Claude.
The whole guide, every prompt included, as one Markdown file. Drop it into Claude Code and say “set this up for me, one chapter at a time”.
What you're building
Three parts. Stop after the first two and you already have the studio from the video.
The studio is three things that work together. Claude Code builds and runs all of them on your own computer, with your own footage.
| Part | What it does |
|---|---|
| The Studio | A local web app. Every option card plays your clip with that look drawn on top. You pick colours, fonts, captions and what happens on each beat, then save it as your style. |
| Your styles | Claude studies 5 to 10 reels from a creator you love and writes down every rule of their edit: layout, captions, motion and sound. That becomes a skill it follows every time. |
| The edit | Claude transcribes your raw clip, cuts the dead air and false starts, plans each beat and renders the reel in your style. Every note you give becomes a rule. |
Set up the workspace
One folder, the tools, and transcription with a time for every word.
Put one raw clip in a folder you can find, open Claude Code in your home folder and paste this. It checks what you already have, installs what's missing and tests transcription on your clip.
You're going to be my video editor. Set up an editing workspace on this computer.

1. Make a folder called editing-studio in my home folder, with these subfolders: clips (my raw videos), references (reels from creators I want to learn from), styles (my saved editing styles), projects (one folder per video) and tools (your scripts).
2. Check that ffmpeg, Python 3 and Node.js are installed. Install anything missing the normal way for my system (Homebrew on a Mac, winget on Windows) and tell me what you installed.
3. Set up transcription with a start and end time for every word, using Groq's Whisper API (whisper-large-v3). Don't ask me to paste my API key into the chat. Tell me the exact line to add to editing-studio/.env myself, and wait until I say it's done. If I'd rather not use a key, set up a local Whisper model instead and tell me it will be slower.
4. Write tools/transcribe.py. It takes a video and saves every word with its start and end time as JSON next to the video.
5. I've put a clip in editing-studio/clips. Transcribe it and show me the first 10 words with their times.

Keep a README.md in editing-studio that explains each folder and tool. Ask me before you delete or overwrite anything.Build the Studio
The app from my video. It works with your clip straight away, before you've taught it any style.
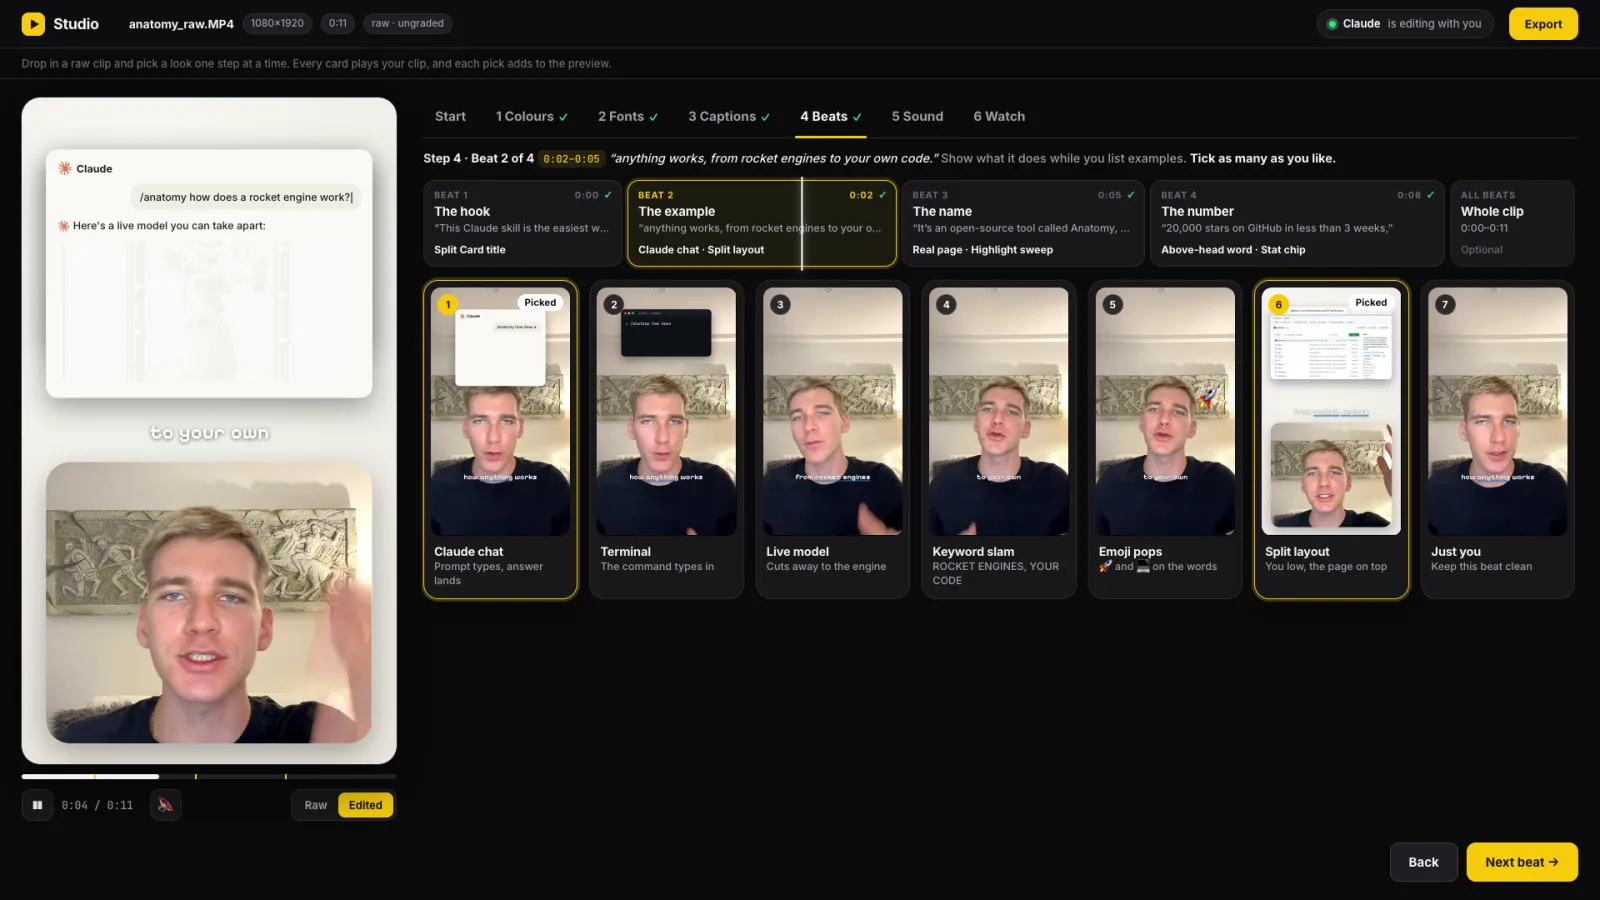
This is the big one. Claude builds a small web app around your clip: a 9:16 preview on the left, the steps on the right, and a card for every option, each one playing your clip with that look on it. Pick a grade, a font and a caption style, then decide what happens on each beat.
Build me an editing studio: a local web app where I choose how my reel looks, one step at a time, and every option plays my own clip with that option drawn live on top.

Use the clip in editing-studio/clips and its transcript from tools/transcribe.py. Put the app in editing-studio/studio. Plain HTML, CSS and JavaScript, no build step.

LAYOUT
- A dark app. Top bar: the app name, the clip's file name and an Export button.
- Left: a big 9:16 preview with play/pause, a scrub bar, a sound toggle and a Raw / Edited switch so I can flip between before and after.
- Right: tabs for the steps, one line of help, and a grid of option cards. Each card is a small 9:16 player of my clip with that one option on it, a number badge and a "Picked" label when chosen.
- Back and Next buttons. A tick on each step once I've picked something, and a short toast after each pick (for example "Synced captions to 38 words").

STEPS
1. Colours: 8 grades as CSS filters (raw, bright natural, clean and cool, warm film, moody teal, punchy, soft matte, black and white), each with an accent colour.
2. Fonts: 8 font pairs for captions and titles. Download the font files and serve them locally.
3. Captions: 8 styles timed to my real word timings: 1 to 3 words at a time, karaoke, one big word, boxed words, bold outline, two-tone key words, minimal lowercase and typewriter.
4. Beats: split my clip into 3 to 5 beats where the meaning changes in the transcript, starting with the hook. Show them as a timeline strip: one segment per beat, as wide as the beat is long, with its words, what's picked on it and a moving playhead. For the hook, offer 8 title styles. For every other beat, offer 6 effects that fit what I'm saying there, picked from: a chat or terminal window typing my prompt, a real web page sliding in, a highlight or outline on that page, a keyword slamming in above my head, a number counting up, emoji popping on a word, a split layout with me low and the page on top, punch-ins, whip pans, shakes and flashes. Add "Just you" to keep a beat clean, let me tick several per beat, and add a "Whole clip" group for things that run across every beat (progress bar, zoom on every cut, flash on every cut, slow push).
5. Sound: whoosh, pop, ping, typing, click and a soft music bed. Clicking a card plays the sound. In the preview each sound lands on the move it belongs to, never at random.
6. Watch: a summary of every pick, a Render button with a progress bar and its steps, and a "Save as my style" box.

RULES
- Every card loops only the part of the clip where its effect happens, and the effect animates in again on every loop. A card should never sit blank.
- On the Beats step the big preview loops the beat I'm on, so I see each pick land.
- The big preview stacks everything I've picked so far.
- Make a small copy of my clip for the cards with a keyframe every 0.2 seconds, so the loops are smooth.
- Serve it with a small Python server that supports HTTP range requests (python -m http.server breaks video seeking) and has a POST /save that writes my picks to editing-studio/styles/<name>.json. Saved styles show on the first screen as ready-made looks.
- Add a hands-free demo on the D key, where a fake cursor clicks through the whole flow in about 40 seconds and my real pointer hides, and R to reset. I'm going to film it.
- Use real assets only: my clip, free fonts, and real screenshots of any website, tool or product I mention. No placeholder images.

When it's done, open it in my browser and click through every step yourself. Fix anything blank, broken or overlapping, then tell me the address and the one command to start it again.Make it yours
The Studio is where you choose. The real edit happens in chapter 6, when Claude renders your clip with the picks you saved. Until then, the Render button is a preview of that step.
- Swap in another clip any time. Ask Claude to point the Studio at a new file and it re-transcribes it and redraws the beats.
- Ask for more options on any step. “Add 4 more hook styles” or “add a beat option that shows a tweet” both work.
- Press D before you film it, so the cursor clicks through on its own.
Pick the creators you want to learn from
The style is only as good as the reels you give it. Pick them like a director would.
This is how I got my split-card style. I gave Claude 30 reels from Nick Sareev, a creator whose edits I love: the speaker cut out low in the frame, real web pages above, small calm captions. Claude studied them and wrote down every rule.
Save the reels for your own study only, by downloading where the app lets you or with a screen recording, and put them in editing-studio/references/<creator-name>. Don't repost them. You're learning the craft, not copying the content.
editing-studio/
├── clips/              your raw videos
├── references/
│   └── nick-sareev/    5 to 10 reels + notes.txt
├── styles/             saved from the Studio
├── projects/           one folder per video
├── studio/             the Studio app
└── tools/ Claude's scriptsTurn a creator into a style
Claude measures everything, then writes it up as a skill it follows on every video.
Study the reels in editing-studio/references/<creator-name> and turn their editing into a style I can reuse. Read my notes.txt in that folder first.

1. For every reel, make a contact sheet with a frame every 0.5 seconds, find every cut, and transcribe it so you know what's said on each shot.
2. Measure everything on a 1080x1920 frame: where the speaker sits and how big, every layout and when it switches, the caption font, size, weight, colour and position, how many words show at once and which words get picked out, everything that appears on screen (cards, screenshots, stickers, numbers) and where, how things come in and go out, how long shots last, zooms and when they happen, and where each sound effect lands compared with what moves on screen.
3. Look at the first 3 seconds of every reel on their own: what moves, what text appears and when the first cut comes.
4. Split the work between several agents if you can (layout, captions, motion and sound, hooks), then merge what they found. Where reels disagree, go with the majority and note the exceptions.
5. Write it up as a skill in ~/.claude/skills/<style-name>/: SKILL.md (what the style is, when to use it, and an empty "Standing rules" section at the top), references/style-spec.md (every measurement, with the reel and timestamp it came from) and references/beat-planning.md (how to decide what happens on each beat of a new video).
6. Name the style after how it looks, not after the creator. Then tell me the 3 things that make this style different from a generic edit.
7. Add it to my Studio as a ready-made look, with its captions, fonts, layouts and effects.

Show me 3 contact sheets before you write the skill, so I can check you're looking at the right things.
What it found in Nick Sareev's reels
| What | The rule Claude wrote down |
|---|---|
| Layout | The speaker is cut out of the background and sits in a rounded panel low in the frame, with the head breaking out of the top. |
| Visuals | Real web pages and screenshots above the panel, with highlights, outlines, whips and numbers that count up. |
| Captions | 1 to 3 words at a time, with the key words in a blue italic serif. |
| Cuts | Layouts switch on hard cuts, and every trim in the speech hides behind one. |
| Motion | A dark entry that zooms the whole frame from 1.15× down to 1×. |
I named it split-card-reels, after how it looks. Now when I say “edit this like Nick”, Claude loads that skill and follows it. You can keep as many named styles as you like.
Edit a real reel
Your raw clip in, a finished 1080×1920 reel out, with a storyboard you approve first.
Now point it at a fresh clip. Claude plans before it renders, so you see the beats and what appears on each one before it spends time on the full video.
Edit editing-studio/clips/<file> in my <style-name> style, using the skill in ~/.claude/skills/<style-name> and any picks I saved in editing-studio/styles.

1. Transcribe it. If I said a line more than once, keep the cleanest full take and tell me which ones you dropped. Cut dead air and false starts using the audio's loudness, not just the transcript.
2. Split it into beats and write a storyboard: for each beat, the words, the layout and what appears on screen. Use real visuals (screenshots of the actual page, tool or product I mention), never made-up ones. Show me the storyboard and wait for my OK.
3. Build the edit with a script in the style's skill folder, so the next video is quicker, and render it at 1080x1920, 30 fps, with HyperFrames (npx hyperframes) and ffmpeg.
4. Keep captions and cards inside Instagram's safe zone (clear of the top 220 px, the bottom 420 px and the buttons on the right) and off my face.
5. Master the audio to -14 LUFS. Put each sound effect on a visible move and keep any music well under my voice.
6. Save it as editing-studio/projects/<name>/renders/<name>-v1.mp4, show me 3 stills from it, and list anything you weren't sure about.Make every note stick
The first version is never the one. What matters is that it never makes the same mistake twice.
This is the part that turns a decent edit into your edit. Paste this once, then talk to Claude the way you'd talk to an editor.
From now on, every note I give you about an edit is a rule for this style. After each note:

1. Fix it in this video and render a new version (v2, v3 and so on). Never overwrite an old one.
2. Add the note to "Standing rules" at the top of the style's SKILL.md, with today's date and the reason, in one line.
3. If it changes a default (a size, a position, a colour, a sound level), change it in the style's script too, so the next video gets it without me asking.

When I approve a version, save it as the style's reference reel and write down what made it right.
Notes that changed my style
| My note | The rule it became |
|---|---|
| “That grade is horrible, go back.” | Never change the colour without showing me stills of the options first. |
| “Nothing moves in the first second.” | Something must move in the first seconds of every hook. No static title on frame one. |
| “The sound effects feel random.” | Every whoosh, pop and ping sits on a visible move: a cut, a card, a zoom or a click. |
| “The comment word should pop above my head.” | The CTA keyword pops in above the head in yellow caps with a hard red shadow. |
Fix common problems
What went wrong for me, and the sentence that fixed it.
| Problem | What to tell Claude |
|---|---|
| The cards are blank or the videos won't loop. | Serve the Studio with your range-request server, not python -m http.server. |
| An effect shows once, then the card sits empty. | Make every card loop only the part of the clip where its effect happens. |
| Captions or cards cover my face. | Find where my chin is from a frame and keep everything clear of it. |
| Names and products are spelled wrong. | Here are the spellings. Use them in the transcript and the captions. |
| It made up a screenshot or a logo. | Real visuals only. Screenshot the actual page. |
| The render crashes or runs out of space. | Render one video at a time in low-memory mode, and tell me how much disk you need first. |
| It doesn't look like the creator any more. | Re-read the style spec, compare this frame with one of the reference reels and list every difference. |
Get the editing studio setup
Unlock the full guide and all 5 prompts, plus every other resource in the library. Free, one email a week, unsubscribe anytime.